Sometimes situation happens when we need transfer big amount of data between two Linux Mint machines, and one solution for this is directly connecting machines with LAN cable.
Creating network connection
One you have connected the machines with LAN cable, then follow the below steps to make a local network connection between them.
-
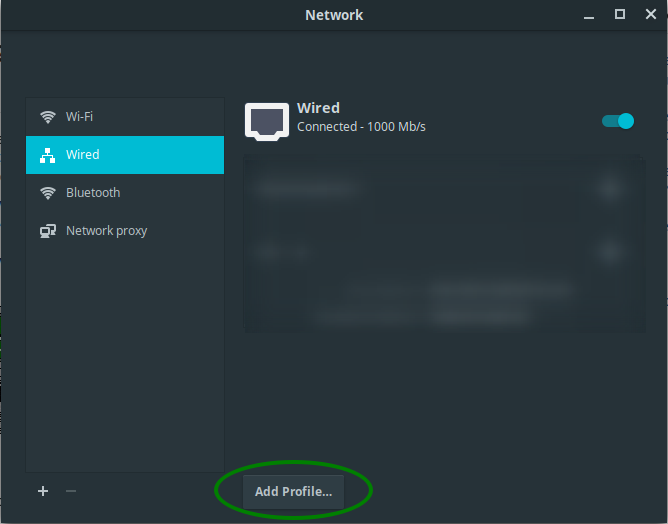
Click on the Mint icon in the bottom left corner of your desktop and choose
Network.

-
Click on the
Add Profile...button to create a new wired connection (marked in below image with a green circle).
-
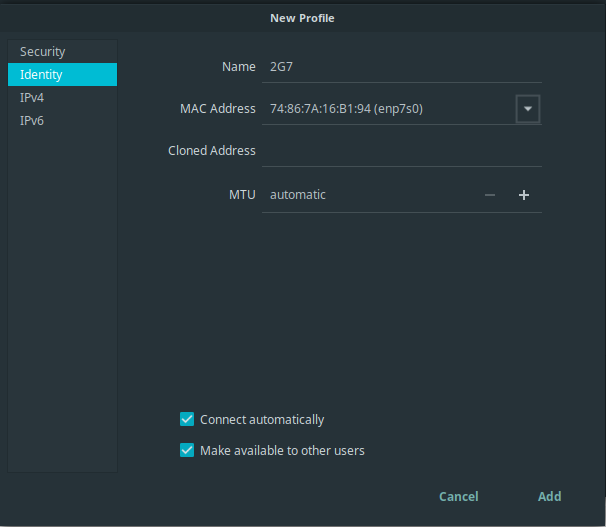
Enter your profile name on
Identitytab and confirm that your MAC address is selected. I named my Profile as2G7, you can enter any other name.
-
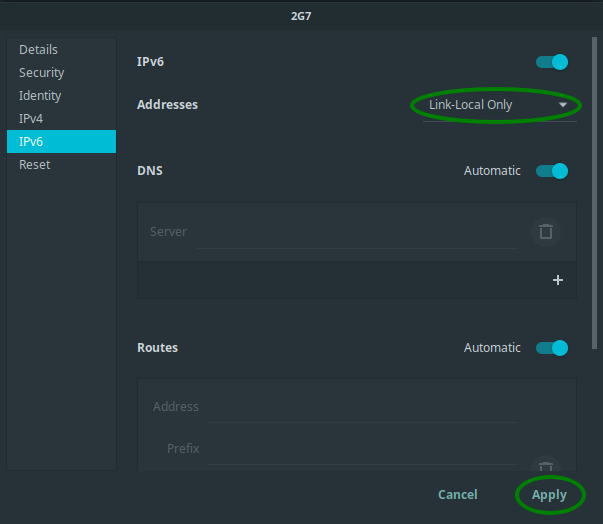
Go to IPv4 option and select
Link-Local Only.

-
Go to IPv6 option and select
Link-Local Only, then clickApplybutton to complete.
Repeat the above steps for another Linux Mint PC.
Now both of your PCs automatically assigned with 169.254/16 IP address by avahi−daemon [The Avahi mDNS/DNS-SD daemon].
File Transfer
It’s time to transfer files between PCs. You can transfer file/folder securely using SCP command (scp use ssh to connect two PCs, but ssh service isn’t installed by default in Linux Mint, so you might need to configure it).
OpenSSH-Server installation
You should verify that OpenSSH Server is installed on destination Linux Mint machine. Very often, OpenSSH Server isn’t installed on Linux Mint by default, so even if you try to connect to your local machine with ssh popov@localhost through SSH you get ssh: connect to host localhost port 22: Connection refused.
You can use Debian’s package management system to confirm whether the openssh-server is installed:
sudo apt version openssh-serverIf you get empty output, then you should install OpenSSH Server with
sudo apt-get install openssh-serverotherwise, simply miss this step.
OpenSSH-Server troubleshooting
If you anyway cannot connect to your destination machine, try this
sudo iptables -A INPUT -p tcp -d 0/0 -s 0/0 --dport 22 -j ACCEPTThis will open the port 22. If this doesnt work.
Look at how you installed ssh. You probably changed the port or something. Really the only thing you need to do to open ssh working.
sudo apt-get install sshThen just type ssh name@localhost.
Also it might have a bad install. So remove ssh and re-install.
SCP command syntax
File transfer:
scp source_file_name username@destination_host:destination_folderFolder transfer:
scp -r source_file_name username@destination_host:destination_folderDescription:
- source_file_name: file/folder which you need to transfer from source_mint to destination_mint.
- username@destination_host: username of destination_mint (you can find this by running
whoamicommand in the destination_mint terminal) and destination_host should be the IP address of your destination_mint (you can find this by runningifconfig | grep "inet "command in destination_mint terminal).ifconfig | grep "inet " inet 172.17.0.1 netmask 255.255.0.0 broadcast 172.17.255.255 inet 169.254.35.179 netmask 255.255.0.0 broadcast 169.254.255.255 inet 127.0.0.1 netmask 255.0.0.0 inet 192.168.1.117 netmask 255.255.255.0 broadcast 192.168.1.255Note: Your destination_mint IP address would be somewhere in the range of
169.254.XX.XXas it was automatically assigned by avahi-daemon, or192.168.XX.XX, you should connect to both successfully. - destination_folder: File path where you want to place your file in distination_mint.
Example SCP command
scp -rpC /media/popov/work popov@169.254.35.179:/media/popovWhile executing the above command, it will prompt to enter your password twice (first for executing scp command and next for adding destination_mint as your known host in ssh_config file. After you enter the password, it will transfer the work folder from source_mint to destination_mint under /media/popov folder. -r option added to scp command means recursivecopy. You can read more about SCP options here.